
Lasernote video tutorials
It is assumed that you already have Lasernote installed and running. If not, please consult Getting started section in the Lasernote user manual.
The tutorials are most conveniently viewed on a large screen with your mobile/tablet as a second device. Switch on your laser measure and start Lasernote. The devices should get connected automatically in a short time – the Bluetooth icon will turn blue. If connection was not established, consult Bluetooth setup in Using Bluetooth section.
Quickstart - 3 steps into Lasernote
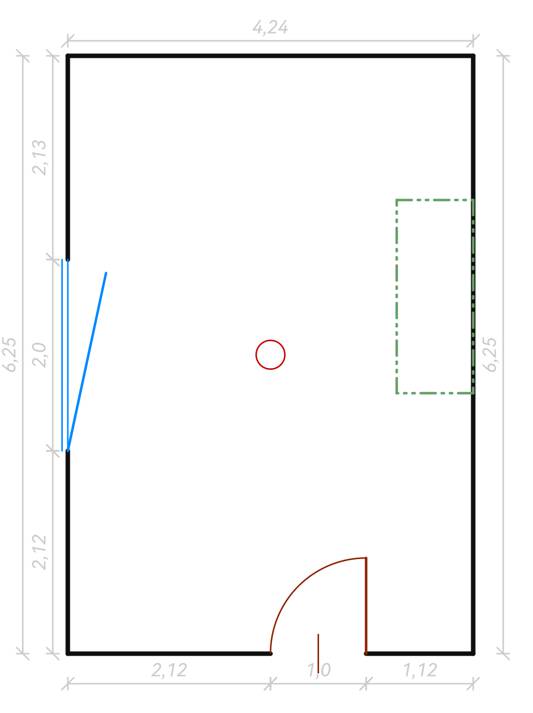
A series o three tutorials for beginners that have never used Lasrnote before. They explain how to do a basic measured survey of a single room with door and window opening, equipped with a desk and a ceiling lamp. The goal is to create a sketch similar to the one pictured below.
Step 1 - measure wall outline
In this part you will learn how to create a new plan and how to measure and draw wall outline.
Step 2 - advanced measurements
In this part you will take the wall outline from the Step 1 and learn how to add more measurements along the walls, as well as new measurement lines branching off the walls.
In steps 1 and 2 you have learnt how to conduct measurements:
- measurements are generally driven by tap, double tap and drag gestures;
- to add new measurement line, drag the Measurement cursor from the start point towards the desired end point;
- measurement bar on a scren bottom allows to enter distance using laser meter or keyboard;
- to move the Measurement cursor to a new start point, double tap on the selected point;
- to add more measurements along one line, double tap on this line to add new measurement point.
Step 3 - decorate the plan
In previous steps you have created a measurement network for an example site. Lasernote partially decorated the plan with black wall lines, using automated application logic. Now we need to complete the sketch by adding more symbols to make the sketch fully informative: symbolic lines for door and window, point symbol for lamp and simple line symbol for desk outline. These decorative elements are called shapes. From now on we stop using measurement tools and instead we are going to deal with drawing tools and shapes.
In this part you have learnt how to decorate the sketch with shapes:
- drawing shapes is generally driven by long press gestures;
- to add a line shape use a sequence: long press on start point – choose command "Draw a line" – tap on end point;
- if you want to use previous style, use a style shortcut instead of "Draw" command;
- to add a point shape long press on a measurement point and choose "Draw a point";
- long press on an existing shape opens context menu with basic styling options and shape properties.
- to delete the shape long press on it and choose Delete command.
The measurement and drawing features have been strictly separated in this tutorial only for a purpose of easier learning. In a real practice, as you get more familiar with the tools, you would rather use them in a more mixed, parallell way, by drawing the shapes as soon as various features have been measured.
At the end you can explore how various elements of your sketch belong to different Lasernote layers.
Explore Lasernote
Organize, browse and sort your plans
View menu and layers
View menu allows to swith between view layers. Additionally you can toggle the visiblility of dimension lines (in plan view) or grid (in measurement or standard view).
Measure on plan
When in plan view, you can tap on the shapes and measure their dimensions. This way you can also measure areas and angles.